# Little Prynter
---
 > Print out shit from the cloud on a thermal paper.
## About
This project started when I got a Thermal Printer from a friend. It's now evolved to a complete web solution to print out text and images.
## Requirements
To make this project work, you will need :
- A Thermal Printer :
- I used *Adafruit's thermal printer* at first, but it broke down. You can get it [here](https://www.adafruit.com/product/597).
- I then used an *EPSON TM-T2OIII*. It's expensive, but it's also high quality, and has better CUPS and specific library support.
- A Raspberry Pi or any computer with USB or Serial.
- Some electric wires.
- Some knowledge of the command line,
- Some knowledge of Python.
- You will need to install [Poetry](https://python-poetry.org/) to manage the depedencies of the projet.
- 3h of your time, 5h if things need debugging.
- You will need to following packages: `fswebcam`, `libjpeg-dev` ,`zlib1g-dev`,`libffi-dev`,`git`, `virtualenv`,`pip` and `python` >= 3.8.6.
- A webcam for the webcam page to work. Will work on a smartphone. Not required.
## Context
### Testing your printer
For the EPSON TM-T20III, you can get the CUPS driver from [here](https://download.epson-biz.com/modules/pos/index.php?page=soft&scat=32). It's not specific to the printer I've been using, so you can try with other printers.
With that, you can try out your printer and print normal text, images or pdf documents for example. For the Adafruit printer, start by following the guide [here](https://learn.adafruit.com/networked-thermal-printer-using-cups-and-raspberry-pi) to install the CUPS software needed to print images. If you want, you can install it via the command line, [following this guide](https://help.ubuntu.com/lts/serverguide/cups.html).
You can also get some information from [here](https://learn.adafruit.com/mini-thermal-receipt-printer) and [here](https://learn.adafruit.com/instant-camera-using-raspberry-pi-and-thermal-printer) if you're stuck.
### How LittlePrynter works
LittlePrynter itself does not require any other software than the ones installed with it, i.e the ones listed in the `pyproject.toml` file.
The version for the EPSON TM-T20III uses a library called `python-escpos`, which doesn't need a CUPS driver or anything else. It's included in the Python dependencies.
The project only supports the EPSON printer, but you can try to adapt it for other printers. For example, using `adafruit-thermal`, or `brother-ql`.
### Install & setup the project :
Theses commands will copy the software on your computer, go into the directory, then activate a virtual environnement and install all of the project's dependecies.
```
$ git clone https://git.n07070.xyz/n07070/LittlePrynter
$ cd LittlePrynter
$ eval "$(poetry env activate)"
$ poetry install
```
> tip : when you're done, you can get out of the poetry environnement either by closing your terminal, or by running `deactivate`.
### Configure LittlePrynter
You should see a folder named `configuration`. Enter it, and duplicate the file named `config.toml.sample`, and rename the copy to `config.toml`. Now, edit this file by following the comments in the file itself.
You should also setup the proper `udev` permissions to access the printers via USB, following the configuration found [here](https://python-escpos.readthedocs.io/en/latest/user/installation.html#setup-udev-for-usb-printers).
You can now start the web server with
```
$ export FLASK_APP=src/main.py
$ flask run --cert=adhoc
```
The `--cert=adhoc` argument will make LittlePrinter accessible in HTTPS with a [self-signed SSL certificate](https://en.wikipedia.org/wiki/Self-signed_certificate). This provides a free and easy way to use HTTPS, but does not provide any trust value. It is, on the other hand, a good way to access the webcam in developpement mode or on a local network, because a HTTPS connexion is required by browsers to access the needed APIs.
This command should start a web server with which you can test your configuration. If you plan on exposing your printer to the Internet, and give it an IP / URL, _please, please, please_, don't run it this way. Look at Flask's documentation and read about running a production server. It's a little more work, but it will prevent your computer/server being hacked in too easily.
Voilà !
## Contributions
Your contributions are very much welcome ! You can either request an account on git.n07070.xyz, or send me a patch by email ( see git-send-mail.io ). Please [squash](https://www.geeksforgeeks.org/git/use-of-git-squash-commits/) yours commits into one commit, and add as much information in the commit's description. The more you add comments and descriptions, the better it is.
Please also say if you had a printer to test your code, and which printer you've been using.
### Code structure
The app is written about the Flask framework. You can start by looking at the code in the `src/` folder, in the `main.py` file. There, you will see that a few classes are initialized. In general, they are two parts to the program :
The Web pages and the API, which are the user-facing parts. This is with what the users will interact, and define how the program is going to be used. The web pages are renderer from the `include/` folder where Jinj2 templates are defined.
The Worker and Printer Queue are the internal parts. When a new thing needs to be printed, usually sent from the Web or API interfaces, a new Task in the type of the document is created, and added to a print queue. Then, a Worker thread looks up the state of the queue every so often and picks jobs to execute on the printers connected to the system.
The last part of the program is the Raspberry Pi class, that handles to Photomaton mode, which handles button presses, and LED indicator and a flash.
### Linting
If you want to contribute code, please make sure to lint the project before commiting. This helps the code keep a general structure, and avoids some commons erros and mistakes.
To do so, you can run the following command, which will modify your files to be in a certain coding style ;
```
black src/
```
Beware that this command *will* re-write files, so doing `git add ` and then `black src/` and then `git diff` to see what the linter has done is a good idea.
Then, you can run another command, called Pylint ( [documentation](https://www.pylint.org/) ) which will rate your code. Try to get 10/10 : an excellent code works better and make you a better programmer !
```
pylint src/
```
## Screenshots
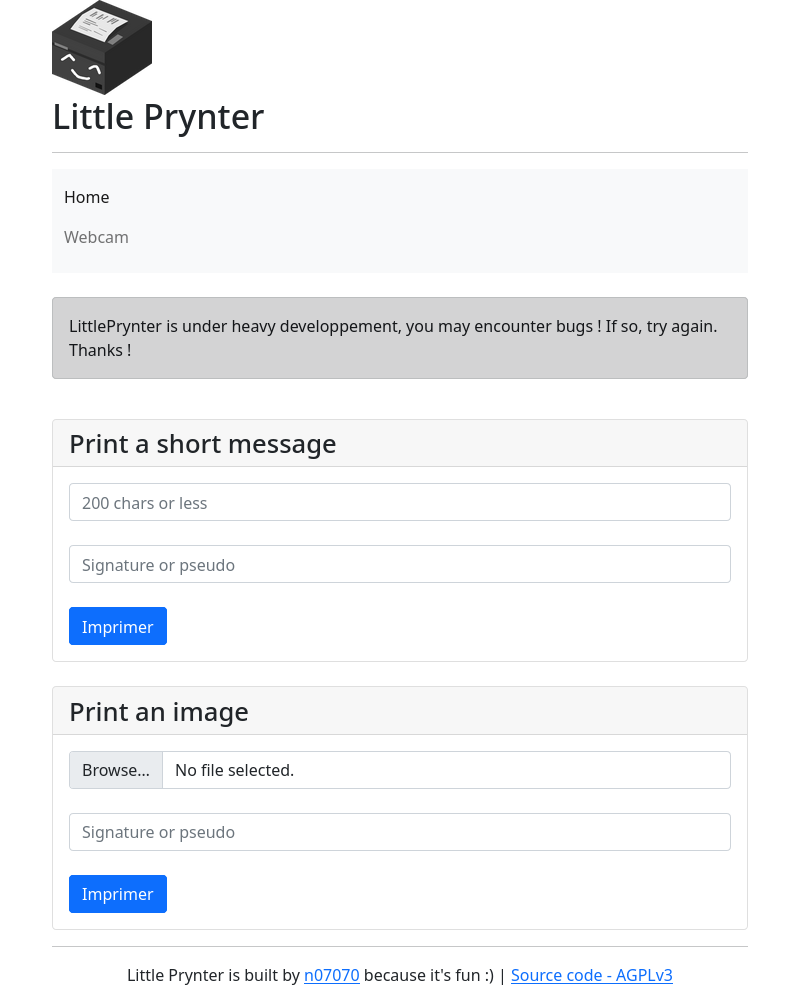
> The first page. You can print a picture, or a short message. It's basically exposing the API in html.
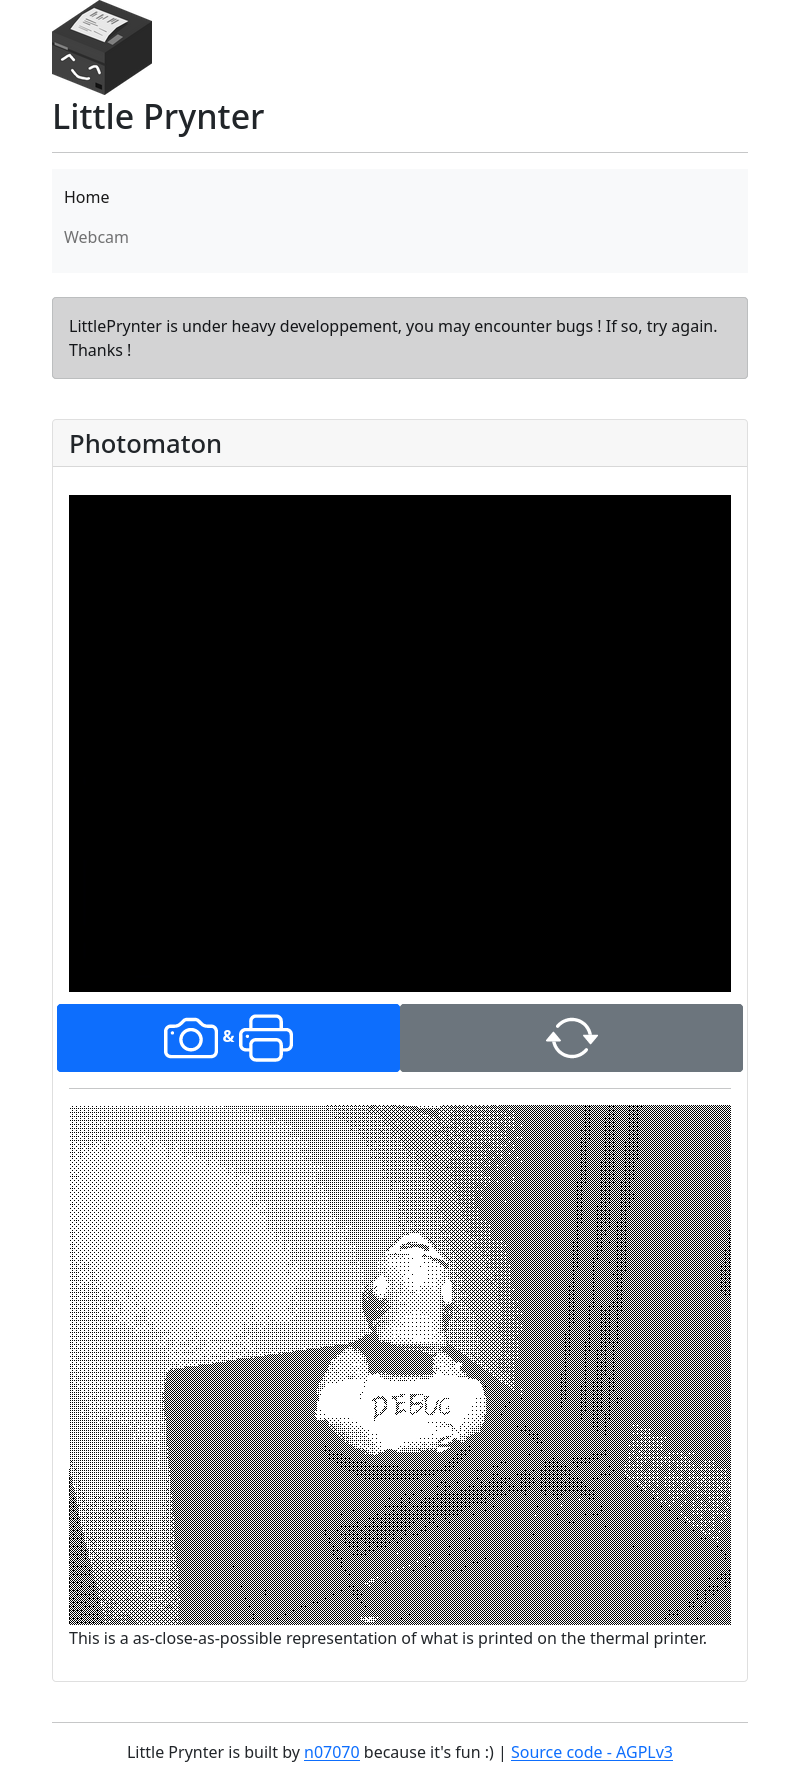
> Using the webcam via Javascript, you can print out a picture from your phone, webcam, or any other video device.
## More
If you liked this project, feel free to support my work !
[Donations welcome ! :)](https://n07070.xyz/about-me)
## Links
- [A blog post about some CUPS configuration](http://scruss.com/blog/2015/07/12/thermal-printer-driver-for-cups-linux-and-raspberry-pi-zj-58/)
- [Github repo with CUPS drivers for the Adafruit Thermal Printer ( zj-58 )](https://github.com/klirichek/zj-58)
- [A link to buy one in Europe](https://rlx.sk/sk/various-boards/1829-mini-thermal-receipt-printer-adafruit-597.html)
- [Another link to buy one, direct from factory](https://www.cashinotech.com/csn-a2-58mm-mini-panel-thermal-receipt-printer_p11.html)
- [Diagnostickoeur](https://framagit.org/stickoeur/diagnostickoeur), another printer software mainly around Brother QL printers.
## Licence
```
LittlePrynter
Copyright (C) 2020 N07070
This program is free software: you can redistribute it and/or modify
it under the terms of the GNU General Public License as published by
the Free Software Foundation, either version 3 of the License, or
(at your option) any later version.
This program is distributed in the hope that it will be useful,
but WITHOUT ANY WARRANTY; without even the implied warranty of
MERCHANTABILITY or FITNESS FOR A PARTICULAR PURPOSE. See the
GNU General Public License for more details.
You should have received a copy of the GNU General Public License
along with this program. If not, see .
```
> Print out shit from the cloud on a thermal paper.
## About
This project started when I got a Thermal Printer from a friend. It's now evolved to a complete web solution to print out text and images.
## Requirements
To make this project work, you will need :
- A Thermal Printer :
- I used *Adafruit's thermal printer* at first, but it broke down. You can get it [here](https://www.adafruit.com/product/597).
- I then used an *EPSON TM-T2OIII*. It's expensive, but it's also high quality, and has better CUPS and specific library support.
- A Raspberry Pi or any computer with USB or Serial.
- Some electric wires.
- Some knowledge of the command line,
- Some knowledge of Python.
- You will need to install [Poetry](https://python-poetry.org/) to manage the depedencies of the projet.
- 3h of your time, 5h if things need debugging.
- You will need to following packages: `fswebcam`, `libjpeg-dev` ,`zlib1g-dev`,`libffi-dev`,`git`, `virtualenv`,`pip` and `python` >= 3.8.6.
- A webcam for the webcam page to work. Will work on a smartphone. Not required.
## Context
### Testing your printer
For the EPSON TM-T20III, you can get the CUPS driver from [here](https://download.epson-biz.com/modules/pos/index.php?page=soft&scat=32). It's not specific to the printer I've been using, so you can try with other printers.
With that, you can try out your printer and print normal text, images or pdf documents for example. For the Adafruit printer, start by following the guide [here](https://learn.adafruit.com/networked-thermal-printer-using-cups-and-raspberry-pi) to install the CUPS software needed to print images. If you want, you can install it via the command line, [following this guide](https://help.ubuntu.com/lts/serverguide/cups.html).
You can also get some information from [here](https://learn.adafruit.com/mini-thermal-receipt-printer) and [here](https://learn.adafruit.com/instant-camera-using-raspberry-pi-and-thermal-printer) if you're stuck.
### How LittlePrynter works
LittlePrynter itself does not require any other software than the ones installed with it, i.e the ones listed in the `pyproject.toml` file.
The version for the EPSON TM-T20III uses a library called `python-escpos`, which doesn't need a CUPS driver or anything else. It's included in the Python dependencies.
The project only supports the EPSON printer, but you can try to adapt it for other printers. For example, using `adafruit-thermal`, or `brother-ql`.
### Install & setup the project :
Theses commands will copy the software on your computer, go into the directory, then activate a virtual environnement and install all of the project's dependecies.
```
$ git clone https://git.n07070.xyz/n07070/LittlePrynter
$ cd LittlePrynter
$ eval "$(poetry env activate)"
$ poetry install
```
> tip : when you're done, you can get out of the poetry environnement either by closing your terminal, or by running `deactivate`.
### Configure LittlePrynter
You should see a folder named `configuration`. Enter it, and duplicate the file named `config.toml.sample`, and rename the copy to `config.toml`. Now, edit this file by following the comments in the file itself.
You should also setup the proper `udev` permissions to access the printers via USB, following the configuration found [here](https://python-escpos.readthedocs.io/en/latest/user/installation.html#setup-udev-for-usb-printers).
You can now start the web server with
```
$ export FLASK_APP=src/main.py
$ flask run --cert=adhoc
```
The `--cert=adhoc` argument will make LittlePrinter accessible in HTTPS with a [self-signed SSL certificate](https://en.wikipedia.org/wiki/Self-signed_certificate). This provides a free and easy way to use HTTPS, but does not provide any trust value. It is, on the other hand, a good way to access the webcam in developpement mode or on a local network, because a HTTPS connexion is required by browsers to access the needed APIs.
This command should start a web server with which you can test your configuration. If you plan on exposing your printer to the Internet, and give it an IP / URL, _please, please, please_, don't run it this way. Look at Flask's documentation and read about running a production server. It's a little more work, but it will prevent your computer/server being hacked in too easily.
Voilà !
## Contributions
Your contributions are very much welcome ! You can either request an account on git.n07070.xyz, or send me a patch by email ( see git-send-mail.io ). Please [squash](https://www.geeksforgeeks.org/git/use-of-git-squash-commits/) yours commits into one commit, and add as much information in the commit's description. The more you add comments and descriptions, the better it is.
Please also say if you had a printer to test your code, and which printer you've been using.
### Code structure
The app is written about the Flask framework. You can start by looking at the code in the `src/` folder, in the `main.py` file. There, you will see that a few classes are initialized. In general, they are two parts to the program :
The Web pages and the API, which are the user-facing parts. This is with what the users will interact, and define how the program is going to be used. The web pages are renderer from the `include/` folder where Jinj2 templates are defined.
The Worker and Printer Queue are the internal parts. When a new thing needs to be printed, usually sent from the Web or API interfaces, a new Task in the type of the document is created, and added to a print queue. Then, a Worker thread looks up the state of the queue every so often and picks jobs to execute on the printers connected to the system.
The last part of the program is the Raspberry Pi class, that handles to Photomaton mode, which handles button presses, and LED indicator and a flash.
### Linting
If you want to contribute code, please make sure to lint the project before commiting. This helps the code keep a general structure, and avoids some commons erros and mistakes.
To do so, you can run the following command, which will modify your files to be in a certain coding style ;
```
black src/
```
Beware that this command *will* re-write files, so doing `git add ` and then `black src/` and then `git diff` to see what the linter has done is a good idea.
Then, you can run another command, called Pylint ( [documentation](https://www.pylint.org/) ) which will rate your code. Try to get 10/10 : an excellent code works better and make you a better programmer !
```
pylint src/
```
## Screenshots

> The first page. You can print a picture, or a short message. It's basically exposing the API in html.

> Using the webcam via Javascript, you can print out a picture from your phone, webcam, or any other video device.

## More
If you liked this project, feel free to support my work !
[Donations welcome ! :)](https://n07070.xyz/about-me)
## Links
- [A blog post about some CUPS configuration](http://scruss.com/blog/2015/07/12/thermal-printer-driver-for-cups-linux-and-raspberry-pi-zj-58/)
- [Github repo with CUPS drivers for the Adafruit Thermal Printer ( zj-58 )](https://github.com/klirichek/zj-58)
- [A link to buy one in Europe](https://rlx.sk/sk/various-boards/1829-mini-thermal-receipt-printer-adafruit-597.html)
- [Another link to buy one, direct from factory](https://www.cashinotech.com/csn-a2-58mm-mini-panel-thermal-receipt-printer_p11.html)
- [Diagnostickoeur](https://framagit.org/stickoeur/diagnostickoeur), another printer software mainly around Brother QL printers.
## Licence
```
LittlePrynter
Copyright (C) 2020 N07070
This program is free software: you can redistribute it and/or modify
it under the terms of the GNU General Public License as published by
the Free Software Foundation, either version 3 of the License, or
(at your option) any later version.
This program is distributed in the hope that it will be useful,
but WITHOUT ANY WARRANTY; without even the implied warranty of
MERCHANTABILITY or FITNESS FOR A PARTICULAR PURPOSE. See the
GNU General Public License for more details.
You should have received a copy of the GNU General Public License
along with this program. If not, see .
```